If you read my last post, then thank you, and you know I am in mid-progress on a Torc design for my husband. The copper precious metal clay (PMC) I had been researching for the finials has finally shown up at the front door. While I was waiting on the shipment I did my homework.
Of course you can find anything on the internet, if you put a little effort into it. Contrary to popular belief there are very few things that have not already been done or said by some other aspiring person. That being said there are many wonderful videos, blogs, and tutorials for working with precious metal clay. I highly suggest doing your research before making the investment. Precious metal clay (PMC) is not like working with ceramic or stoneware clays, nor is it like Sculpy or Femo.
After getting my hands on a batch, I am going to say it is like working with homemade marzipan fondant.
My first attempt ended up back in the storage container. I went back to the tutorials, and even to the manufacture website for their video instructions. I knew after my first experience I had missed something crucial. I found it, everywhere there was a mention of using a separation material, but it was only ever glossed over as a common statement "use your favorite separation material".
Seriously crucial: separation solution AKA Olive Oil.
Thoroughly olive oil everything. I mean EVERYTHING: your table, tools, and hands!
Olive oil is a great and stable solution, it does not react with any of the material, it is easy to clean, burns away without residue, does not spoil quickly, and it leaves your hands nice and smooth.

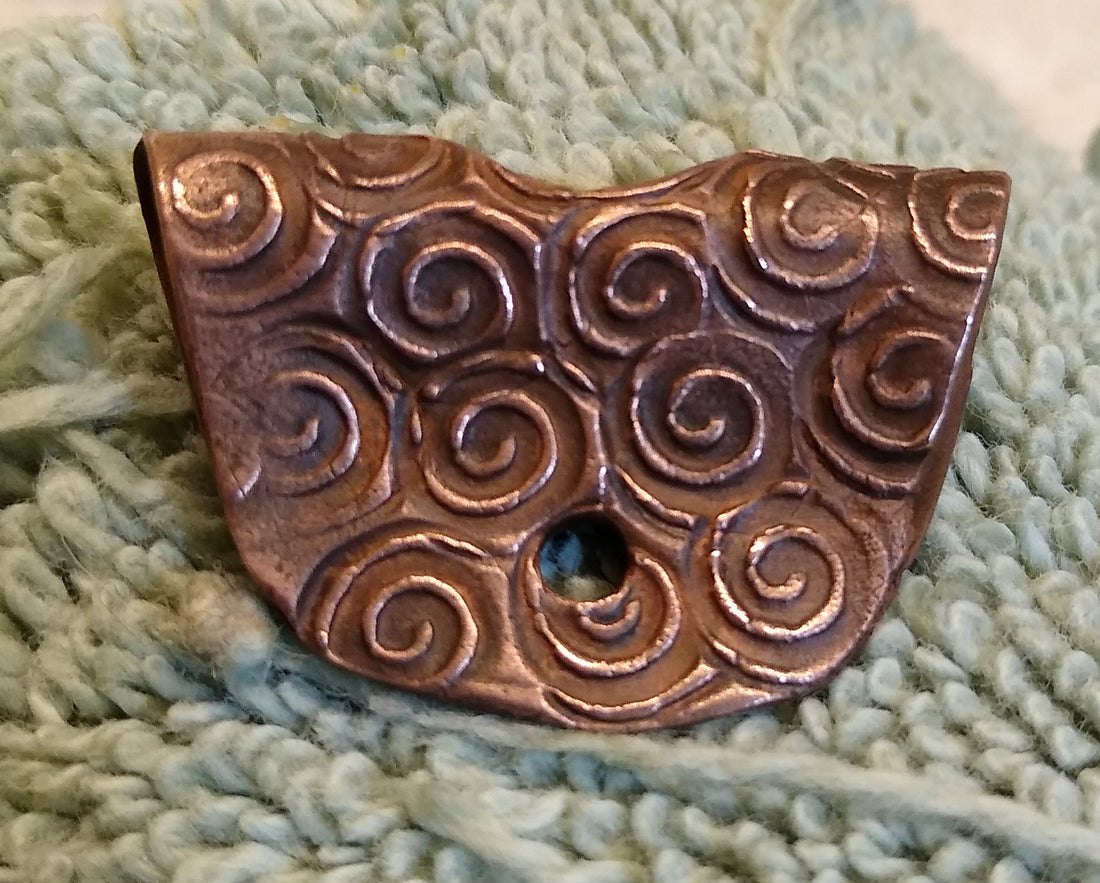
I finally had 2 pieces that I could live with! Luckily with the metal clay if you don't like what you've made, just keep it moist and put it back in storage. I started with the circular medallion: I used an old ring (well oiled) for the spiral, and the pearl end of a sewing needle to do the indents for texture. I then moved on to make the finding, something to suspend wire work from... Again using the well oiled ring for the spirals. It is important to remember that PMC has a shrinkage value, with copper it's about 10%.
I have to admit, this is where I had to build up my resolve. Yes, you can fire PMC in a kiln, I have one for glass working but having my kiln up to 1770* for 30 minutes seemed a waste. Especially since I can't do glass at the same time with out fear of melting my beads flat. I work with a torch on a regular basis, but I still have a healthy fear of exploding items and burning my house down. So I figured out using my old Hot Head Torch, with my propane tank extender. Now that I have found a method that I could work with I had to get it set up.
In my research on PMC, I had also run across Copper soldering. So cool- I could solder my wire pieces together, make my own jump rings, bringing me that one step closer to building my metal working arsenal. So I also made a bunch of 16g jump rings.

I decided to set up my metal working station outside, I did purchase some fire bricks from the local hardware store, and set them up in the Grill. The day I decided to do all this had 45+ mile and hour winds, so I figured the grill set up would give wind protection. It worked rather well! I was impressed.

These bricks are 3" x 6", and you can see my two PMC pendants ready to fire, So small and cute! I started with my medallion, since it was my true first test piece, played with the heat and timing. I ended up burning a portion of the Copper a way so it is no longer circular, but it was really neat to watch the substrate burn away and the metal come through.

Yes, I had to quench it (water with baking soda) and then pickled it (warm vinegar with salt). After a nice polish I was so happy!
What about the jump rings? Oh that was even cooler. Watching the solder bead into the metal ring, I can say it was extremely satisfying. I think having a 5 minute relaxation video of metal liquefying and solidifying would be amazing. the final result:

Easy enough to do the post firing rig-a-marole with the PMC pieces, but I now have a handful ready to do for my next projects.

The PMC pieces, jump rings, and a Krakken ready for LOS, to give it that fabulous patina.
Now onto making the finials for the torc. Hopefully that will be the true subject of the next post :)